
If you’re thinking about welding, a MIG welder is a great place to start. They’re affordable, easy to use, and can handle a lot of welding jobs. So, how to use a MIG welder for beginners? Here’s everything you need to know to get started with this popular welding process. Let’s find out more with weldfaq!
How to Use a MIG Welder for Beginners
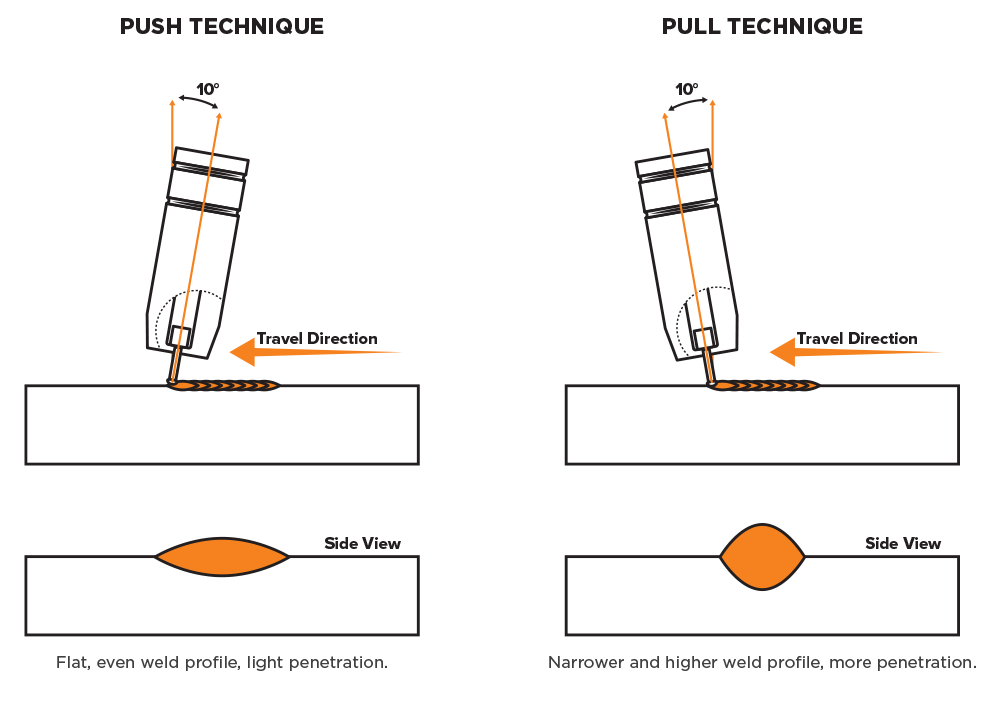
1. Make a decision regarding whether to pull or push
The decision to push or pull while MIG welding depends on the type of metal and the joint being welded. For thin metals, it is typically recommended to push the MIG gun, as this allows for better control and a more consistent weld bead. For thicker metals, it is often recommended to pull the MIG gun, as this allows for better penetration and a stronger weld.
Ultimately, the decision to push or pull should be based on the welder’s comfort level and the specific requirements of the job. It’s important to practice both techniques and use the one that works best for the particular situation.
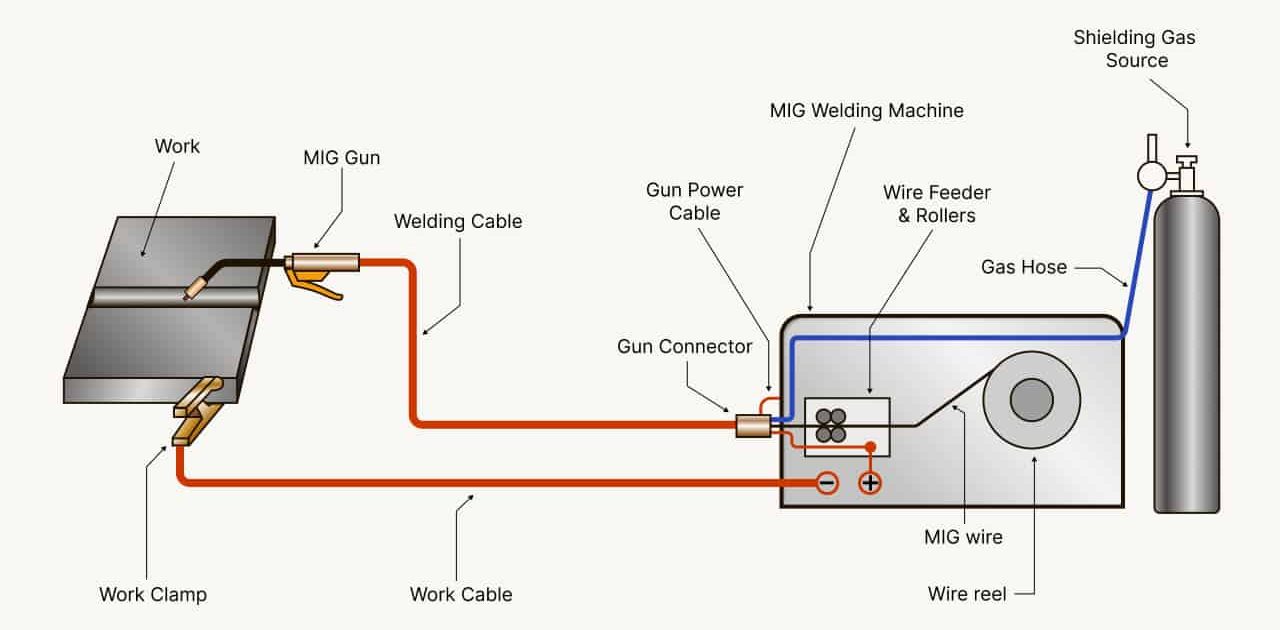
2. Set up the MIG welder
Find a flat, level surface for the welder, with adequate ventilation and access to electrical power. Attach the MIG gun to the welder, following the manufacturer’s instructions. Connect the gas cylinder to the welder, and ensure it is securely in place. Attach the ground clamp to the metal you will be welding.
Plug the power cord into a power source, making sure it is a proper fit and connection. Install the wire spool on the welder, following the manufacturer’s instructions. Set the wire feed speed, voltage, and gas flow rate based on the material and wire type you are using. Turn on the welder and test the machine, making any necessary adjustments to the settings.
It’s important to consult the user manual for specific instructions on setting up your MIG welder, as different models may have slightly different processes.
3. Put on your PPE and conduct a safety inspection
Before using a MIG welder, it’s important to put on the appropriate personal protective equipment (PPE) and perform a safety check. You need to wear a welding helmet with suitable sunglasses, gloves, protective clothing and safety shoes. Also you need to check the safety at work.
Inspect the MIG welder and all its components, including the power supply, gun, grounding clamp and air tank, for any damage or wear. Make sure the air tank is tightened and the air flow is set correctly. Check the power cord for cuts or fraying and make sure it’s plugged in properly. Make sure the ground clamp is securely attached to the metal you will be soldering and the cable is in good condition.
In addition, you must ensure that the work area is free of any flammable materials and has adequate ventilation. It is imperative at welding work sites to have a first aid kit nearby in case of an emergency. By taking these safety precautions, you can reduce your risk of injury and ensure a safe and effective MIG welding experience.
4. Tuning your MIG welder
Tuning a MIG welder involves adjusting the machine settings to optimize the welding process for the specific metal and filler metal being used. Here are the main settings to consider:
- The voltage determines the heat and penetration of the weld. It should be set based on the thickness and type of metal being welded.
- The wire feed speed controls the speed at which the filler metal is fed into the weld. It should be set based on the wire diameter and type of metal being welded.
- The gas flow rate controls the amount of shielding gas used during the weld. It should be set based on the type of metal and wire being used.
- Stickout refers to the distance between the end of the MIG gun and the start of the weld. It should be set based on the thickness and type of metal being welded.
To tune your MIG welder, you will need to experiment with the settings to find the best combination for your specific application. Start with the manufacturer’s recommended settings and make small adjustments as needed. It’s also helpful to practice welding on scrap metal to see the results of the adjustments and make any necessary changes.
5. Angle your gun at about 15 degrees
When MIG welding, it’s important to hold the gun at the right angle to ensure a strong, consistent weld. A common recommendation is to angle the gun at approximately 15 degrees relative to the metal being welded.
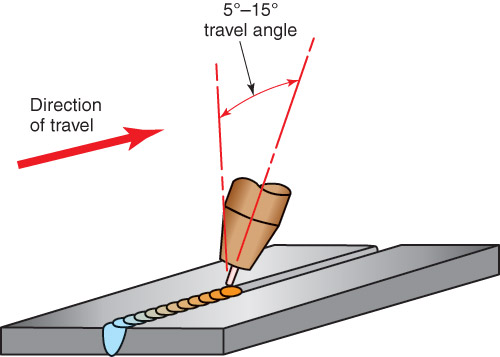
This angle helps to direct the filler metal into the joint, and provides enough heat to melt the metal and form a solid bond. It also helps to reduce spatter, which is the small droplets of molten metal that can form during welding.
It’s important to maintain a consistent angle throughout the weld to ensure a smooth, even bead. It may take some practice to get the angle right, but it’s a crucial aspect of MIG welding. The angle can be adjusted based on the type and thickness of the metal being welded, as well as the welder’s preferences and experience.
6. Pull the trigger
performed a safety check, and adjusted the settings on your MIG welder, you are ready to start welding. Hold the MIG gun at the correct angle (typically around 15 degrees) relative to the metal being welded. Pull the trigger on the MIG gun to start the flow of filler metal.
Move the gun along the joint in a steady, controlled motion, keeping the gun at the correct angle and maintaining a consistent speed. Release the trigger when you reach the end of the weld or when you need to pause. Repeat the process as needed to complete the weld.
It’s important to practice welding on scrap metal to get a feel for the process and make any necessary adjustments to your technique. With time and experience, you will be able to produce strong, consistent welds with a MIG welder.
7. Check your weld bead
Once you have completed a MIG weld, it’s important to check the weld bead to ensure that it’s of good quality. The weld bead should be smooth and consistent, with no voids, cracks, or other imperfections. The weld bead should have good penetration, meaning that it has reached the base metal and formed a strong bond.
The weld bead should have a consistent crown, which is the rounded surface at the top of the bead. The weld bead should have good reinforcement, meaning that the filler metal has built up enough to form a strong bond and reinforce the joint.
The weld bead should have minimal spatter, which are small droplets of molten metal that can form during welding. The width of the weld bead should be appropriate for the thickness of the metal being welded.
If the weld bead doesn’t meet these standards, it may indicate a problem with the welder’s technique, the MIG welder settings, or the type of metal and filler metal being used. In that case, it may be necessary to adjust the settings or technique and try welding again. Over time, with practice and experience, you will be able to produce high-quality weld beads.
Rounding It Up
If you are a beginner welder, using a MIG welder is a great way to get started. Follow the safety guidelines that are provided by your welder manufacturer, and be sure to familiarize yourself with the different functions of the welder before you start welding. How to use a MIG welder for beginners? By following these simple steps, you will be able to get started welding without any problems.